Showing posts with label promarkers. Show all posts

Sunday, 27 January 2013

Makes 5, 6 and 7...358 to go


I spotted a free digi stamp online so decided to print out a few and make some cards. I have packaged them all up ready to sell at my next craft stall :) 


Sunday, 16 September 2012

Time for something a bit different

Its my grans birthday next week and this week I spent a couple of evenings planning and making her Birthday card.

I decided I wanted to try something a bit different and rather then using stamps with animals or people in them I would use a floral stamp. I ended up getting a digi stamp from Tiffany Doodles which is a website I have never used before but will definitely be using again.

I found a stamp with a pansy in a pot which I thought my nan would really like, it took a bit of experimenting to work out the shading with my pro markers but after a few attempts I managed to get it right. I decided to keep the card quite simple and used a recycled card blank teamed with some floral patterned paper and a piece of colored pattered paper at either corner. I then cut out the stamped image and mounted it on the card using silicone glue to give it some dimension. I printed my own greeting and distressed it using the Tim Holtz distress ink pad.

Overall I really like this card it's very different from the other cards I have made but I certainly will be using this style again.


Friday, 4 May 2012

Boofle

I love boofle I think he is such a cute character so I was really excited when boofle crafting supplies were released earlier this year.

I have some of the boofle embossing folders but so far only one stamp that came free in the last issue of Do Crafts magazine. I did a quick card with this free stamp as an experiment and I am fairly happy with the result as it was something I throw together in half an hour.


The card was done on some of the square papermania recycled card blanks. The paper used to back the image was from some freebie paper I had in a magazine ages and and the image was coloured with promarkers. I added some ribbon along the fold to give the card some extra interest. 

Wednesday, 4 April 2012

WOYWW 4th April


I have missed WOYWW for a couple of weeks, glad to be back this week though to have a snoop round other peoples craft spaces. If you would like to join in then head over to Julia's wonderful blog.


This week I have been finishing of my easter cards, it took me a while to get my card making mojo back as have been spending the last month or so experimenting with other crafts. I am quite happy with the card I made though as it only took a couple of hours to complete. The stamp is one I got in hobby craft a few weeks ago it's so cute!


 As you can see my desk this week is again the floor, my actual desk is in my spare room and I like to watch the TV whilst I craft so I never seem to use my actual desk, maybe I should move the desk into the living room...hmmm.

Wednesday, 28 March 2012

Easter Cards

I have been meaning to start making my easter cards all this week but I just haven't really had any idea what I wanted to do for them.

I started colouring in an easter themed digi stamp this evening and got it all coloured and cut out but then I just couldn't decide what type of card to make with it. I seem to have lost my creative mojo :(


Im not massively happy with my shading on this image either, don't know whether to scrap it and start again? What are other peoples ideas for easter cards I need some creative suggestions.

Tuesday, 6 March 2012

Mothers Day Card Pt 2

Just a quick post to show you the Mothers day card I have made for my mum this evening.

I am really happy with the way the stamped image turned out but not at all happy with the rest of the card I don't think the front flap really matches the design at all. I guess craft is a learning curve and not every project can be perfect.

I am still going to enter my card for the latest challenge over at passion for promarkers. Nothing ventured nothing gained I suppose.

Apologies for the photo still no camera and I cant get blogger to rotate the photo either gaaaah I despair with technology this evening.

Monday, 5 March 2012

Mothers Day Card

Just a quick post to show you all the mothers day card I have been working on for my gran. It's a pro marker coloured image of some teddy bears.

I mounted the image on some embossed dark card stock and put it on to a maroon coloured card. I added a stamped sentiment which I also mounted on some pink card stock. I decided the card looked a bit plain so added some glitter glue round the sentiment and some heart buttons to try and jazz it up a bit.


I'm still not sure its completely finished any suggestions to extra bits I could add.

Sunday, 22 January 2012

Poundland Storage Solutions

Lots of lovely crafters have given me advice on the best way to store all my new found craft stash and quite a few people have suggested popping to Poundland for some super inexpensive craft storage solutions.

I went in earlier and found these amazing baskets for a £1 which I think are great for storing my promarkers in for the time being. I have seen some very elaborate storage solutions which I really love but for the time being I want to be spending money on more stash and not storage.

I got a great suggestion earlier which was to put elastic bands around the different colour families so that the colours which blend together are all stored together and easy to locate so thats my job for tomorrow.

Saturday, 21 January 2012

Teddy Bear Card

Today I spent my day reorganizing and tidying most of my flat, yes it is as boring as it sounds. The flat is super tidy and organized now though so I rewarded myself with some chill out craft time this evening.

I have been colouring in a few of my digi stamps so I have a supply of ready coloured images to use when wanting to make a card quickly. I made one card tonight using a cute teddy bear stamp.
I coloured and shaded the bear using my pro markers and then cut him out using my scissors and craft knife, Im thinking of investing in some of those special decoupage scissors as it so fiddly doing it with the big scissors and knife. I also cut out the heart shaped balloons separately. I used some of the airmail style paper from the Portobello Road collection and cut this to form a large strip down the centre of my cardstock.  I stuck the bear on and then used 3D foam pads to attach the balloons so they had a sort of floating effect. I then found some old elastic that I had laying around in my sewing box and stuck this on with pva glue to make the balloon strings. Overall I am happy with this card I really feel like I am getting better at this whole crafting thing :) Not sure if this card needs something else though, it just feels like something is missing from it not sure what though, any suggestions?

I am going to be entering this card into the I love Promarkers challenge which this week is an anything goes theme.

Friday, 20 January 2012

Scarf update

So this was meant to be a quick post to update you on the progress of my scarf. Unfortunately progress has almost ground to a halt as the stitches have got so tight that it is impossible to knit the next row. I think I'm going to do a bit more reading on knitting and then start again on a whole new scarf.

Tonight I have been having a bit of a spring clean of my flat and tidied the living room, kitchen and bathroom I have been epically busy since November last year that a good sort out was long overdue. This didn't leave me much time for crafting but I managed to cram in half an hour or so of creative time before bed.
As the scarf was a complete no go I got out my promarkers. I had printed out some more digi stamps earlier in the evening which I am planning to use to make some cards, some for particular occasions but some for challenges which I am becoming addicted to. I just love making cards for the challenges but also love seeing how other people have interpreted the theme.


I love using my pro markers I find it really relaxing to just sit and colour in the different images. I mainly do animals but am trying to learn how to get skin tones correct so tonight have been working on this cute stamp of a girl with a cupcake. It's still not finished got a bit too tired to concentrate on it, am going to finish that off tomorrow.

Monday, 16 January 2012

Quick Card

Tonight I made a quick card to enter in to the latest challenge on the I love Promarkers blog. I had to get  the train to work at 7am this morning so by the time I got round to crafting time I was pretty tired so decided to work on a quick and simple design.

I used Promarkers to colour in a cute image of a hamster eating a cupcake and then added a little bit of shading to the image. I then cut this image out and decided it would look best on a slightly unusual size card. I cut my cardstock down to make a 15cm by 15cm square and then folded this in half. I then covered one side of the card with some super cute cloud paper. I positioned the hamster in one corner of the card attached a chip board sentiment and some heart shaped buttons in various colours.
Overall considering this is only about the fifth card I have made I'm really happy with the way this card has turned out. It only took me about an hour to make and was a nice chill out activity after a long day in the office.

Friday, 13 January 2012

Lantern Making (Part Two)

The lanterns I was making earlier in the week are now dry, tonight I put some small tealights in them to test them out and I am really happy with the effect they give off. For the moment I am going to use them as candle holders and have them on the work surface.

I made the little one I showed you in part one of this post earlier in the week, and after I left it to dry I had enjoyed it so much that I made another one. This time only using two colours of tissue paper red and blue. When the summer comes I plan to attach wire to the jars and hang them outside when having BBQs and outside parties.

I am going to try this technique with a range of different shaped jars and try them with various candles to experiment with the different light effects that can be achieved. I also read that you can use pro markers to colour on glass and give a stained glass effect which I am quite excited to try. So watch this space for more lanterns in the future.

Wednesday, 11 January 2012

WOYWW

So last week whilst blog hopping I stumbled across this fantastic post where each Wednesday crafters from all over the world congregate on Julia's blog to share pictures of their work desks and the a particular projects they have on them on that Wednesday.

I only discovered the blog a few days ago and have to admit that I have been hooked ever since. It is so interesting to see how other people organise their work spaces, its also great to see that the people that post vary from novice crafters like me to some real craft artists whose work just amazes me.     

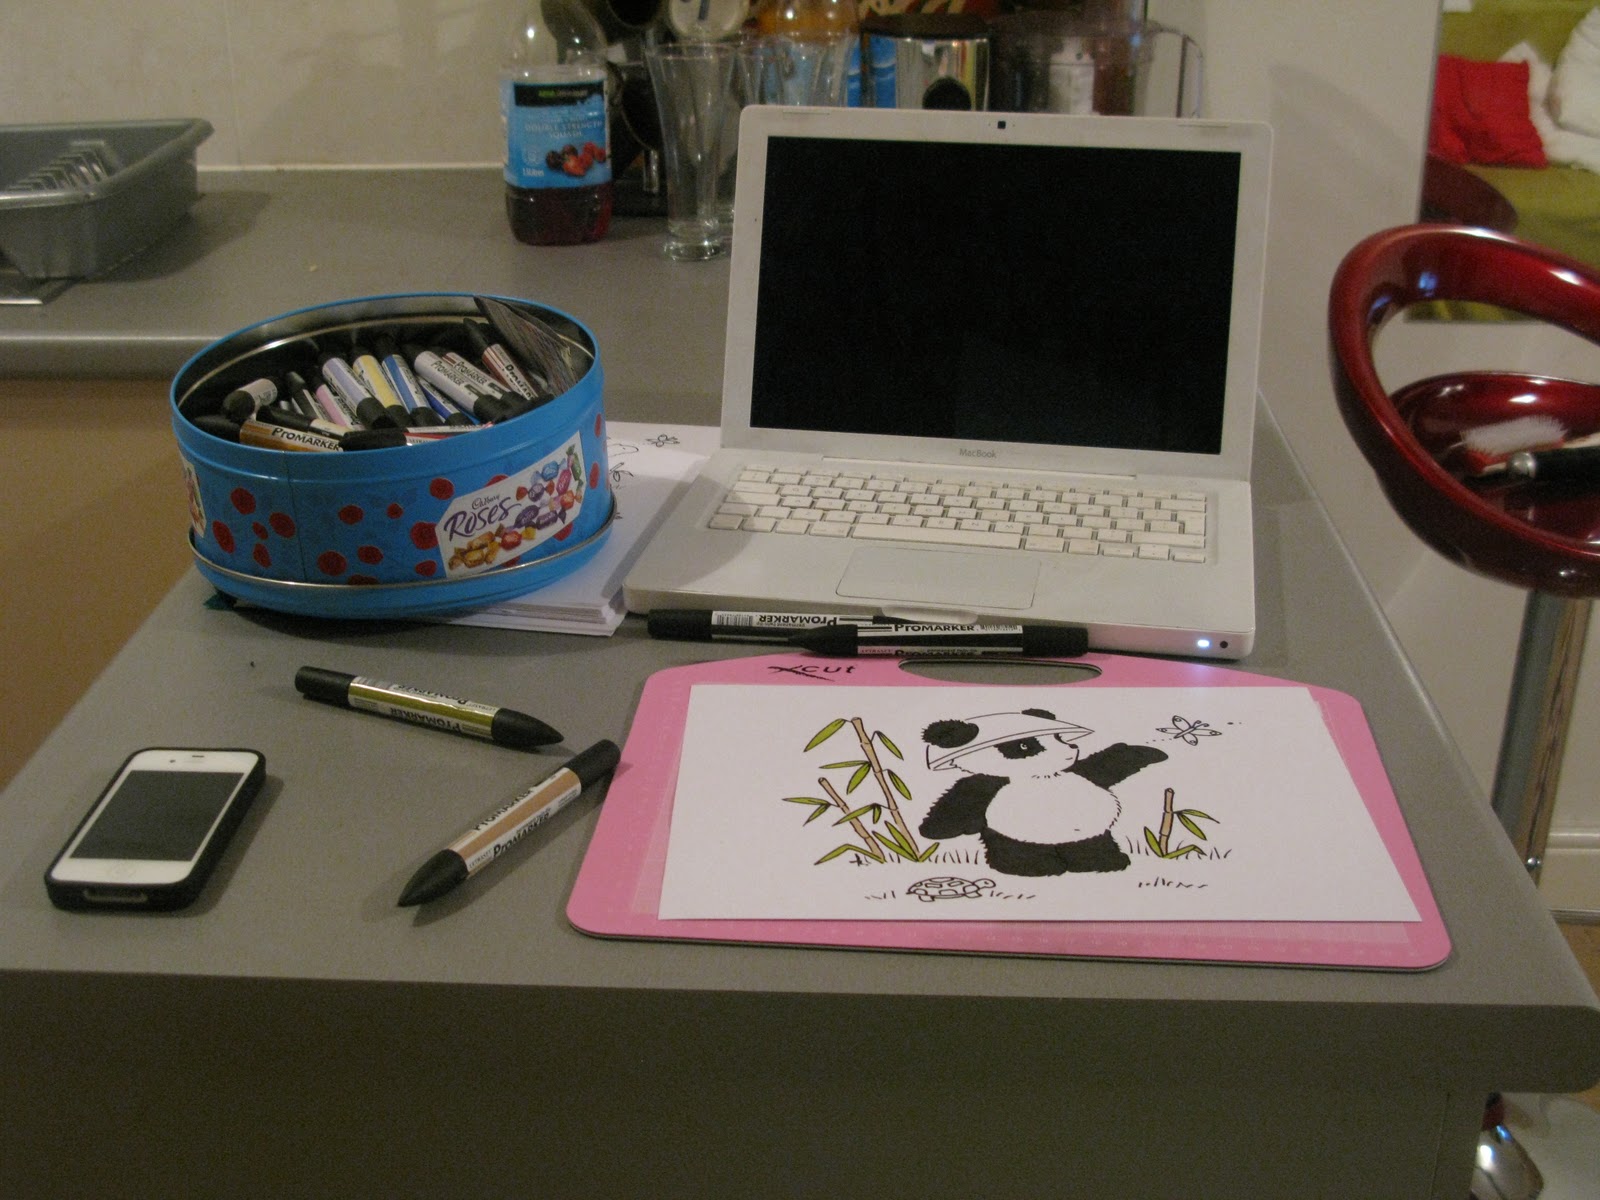
So far I don't actually have a desk solely for craft so kind of just spread out in the kitchen or lounge. This week I have been working on Thank You cards and decided to do something a bit unconventional so have done a thank you card with a panda on. As you can see from the first picture I used my large collection of pro markers to colour in the digi stamp.

I store my promarkers in a old sweet tin and to be honest its not great it is hard to find which colour I am looking for and its impossible to keep the pens in colour groups which makes it quicker to get the colours needed for blending. Some sort of storage solution needs to be purchased asap. 

As you can see from the above picture my desk gets a bit messy when I am fully immersed in a project. In the background you can see a pad of multi coloured card stock which I purchased in Lidl at the weekend it was a bargain at 1.99 for a pack of 25 sheets. You can also see my self healing cutting mat which I love I use it for everything not just cutting, it makes it much easier to tidy up when I am done if all the bits and bobs are on the mat. You can also see double sided sticky tape which I think every crafter is a little bit in love with, and my craft knife and scissors which I used to cut out all the elements of my digi stamp.

This is the final card not 100% happy with it but pleased as its the first card of this type that I have made. I used a digi stamp which I cut into individual elements and mounted them on different levels of my folded piece of card. The bamboo canes were fiddely to cut out so I don't think they look as neat as I would like. The sentiment circle I did in green and then added stamps I think it would look more effective in a purple colour rather then blending in with the foliage in the rest of the image. I added some glitter glue to the card to make it a bit more interesting. Overall I like the image but think the way I have set up the card could be better I think I would give it 6/10.

I look forward to looking at what everyone else has on there desk this Wednesday.

Sunday, 8 January 2012

Thank You Card

I have started making Thank You cards for sending out to thank people for the lovely presents I got for xmas.

I used pro markers to colour in the image and used an old red xmas paper as well as the blue paper from the new Potabello Road paper collection. I cut the image out using pinking sheers to add a bit of interest to the edge of the image. I then stamped a sentiment using my new alphabet stamps. Overall really happy with this card its quite a simple design but I think its really effective.

I am entering this card into the passion for pro markers Thank You Card challenge. http://promarkerchallenge.blogspot.com/

Sunday, 18 December 2011

Decoupage for Beginners

Today I have made two cards using a combination of coloured digi stamps and some decoupage techniques.

I had two identical images and coloured them both in, I then decided on the elements of the image that I wanted to have raised. For the single robin I decided this would be the hat and the holly branch. I then cut one image out as a whole and cut around the edges, I think a better effect could be achieved if the image was a uniform shape for example an oval but to achieve this I would need some sort of die cut machine which as of yet I don't own. On the identical image I cut out the hat and holly branch I used the scissors to cut out the basic shape and then the craft knife to do the more intricate bits, it was a bit of a faff but I got there in the end. I then affixed them to the matching image using foam pads, I used two foam pads on top of each other to make sure I got a really good 3D effect. I then stuck the whole thing onto a A5 card.

The second image I did was from a digi stamp of some love birds, I decided to try and make it more christmasy by changing the love birds into robins and adding some snow effects. It's not as Christmasy as I would like but I think the 3D decoupage effect on this card is really good.


3D Robin (camera doesn't show 3D hat or holly very well) 
As you can see I only made one or two elements 3D in these cards and stuck with quite simple images, I really enjoyed the technique and the effect it gave so may give it a go with some more complex designs in future.

Lovebirds changed to Robins (camera doesn't show the 3D effect well) 

Saturday, 17 December 2011

Pro Markers Part 2

So after my attempt at colouring in the hamster digi stamps with pro markers earlier, I decided to give it another go, and this time make the stamp into a Christmas card for some friends.

I was much more careful with the merging and blending of colours this time and took a separate piece of card to use as a sort of palette. This enabled me to try different colour combinations and blending techniques out before using them on the final image.


I was much happier with the outcome of this image then I was with the two previous, the shadows aren't perfect but they give the impression I was looking for. I teamed the image up with a tartan paper with shades that matched the colours I had used on the mouse's clothes. I added some faux stitching round the edge of the paper to add to the handmade impression. The mouse image was adjoined to the card using foam pads it gives the card a 3D effect (not too obvious in the photo) I then used some Christmas stamps to create a pattern along the top, the stamps were a cheap assorted pack from Ebay so I think that combined with too much ink meant they didn't come out perfectly but I kind of like the more handmade effect the extra ink around the edges gives. I added the personal touch by stamping my friends names along the bottom. Overall pretty pleased with this card. 

I have decided to enter this card in the Celebrations Mega Challenge at Passion for Promarkers. It's the first time I have entered a competition and my first attempt at using pro markers on a card so I don't hold out much hope, but you cant win if you don't enter.

First Attempt at using Pro Markers

This morning I have been using my new pro markers with some digi stamps. I had researched pro markers on a number of blogs and thought they would be a great choice to colour in stamped images. I have seen some really amazing colouring online and wanted to try it out for myself.

Im going to be honest, its not as easy as many of the online video tutorials make it look, but its great fun experimenting to try and get the shading right. I have coloured in two of the same hamster images and even here I can see an improvement between my first and second attempt. Hopefully you can too.


My first attempt is the one on the right hand side and the second attempt is the one on the left. I prefer my second attempt I think that the shadows and shading look better on it. I tried to add a fur texture to my first attempt by layering a lighter sand coloured promarker over the honeycomb one. I am not totally happy with the effect which is why on the second image I just added shadows by using a combination of spice and honeycomb coloured markers.


Overall I am happy with how the image turned out for a first attempt but I can definitely improve, I want the image to be less streaky and marked. I currently only have 20 pro markers I have Rubber Stamp set one and two which are priced at £15 each. In order to improve I decided to order more colours so am waiting for a delivery of another 30 pens as well as a blender pen.

I really enjoyed using the pro markers and can see it becoming very addictive!